In this guide we have a look how to flash (or better: install) UmbrelOS (or other Raspberry Pi/Linux OS images) on the CmRat board using different Raspberry Pi Compute Modules. The flashing method varies depending on your Compute Module’s storage configuration.
Supported Compute Modules
✅ Supported by CmRat
The carrier board supports a range of compute modules, including:
- Raspberry Pi Compute Module 4 (CM4) in both Lite and eMMC variants
- Raspberry Pi Compute Module 5 (CM5) in both Lite and eMMC variants
- CM4/CM5-compatible alternatives like Radxa CM3, CM5, and CM5 Lite, Orange Pi Compute Module 5, and Milk-V Mars CM
This review will be focused on the Raspberry Pi Compute Module 4 and 5, given their broader software ecosystem and dedicated operating system builds like UmbrelOS that are specifically optimized for these modules.
Understanding Storage Types
Compute Modules come in two storage configurations:
CM4 Lite (No eMMC)
- Uses an SD card for storage
- Image is flashed to a microSD card
- Simpler flashing process
CM4/CM5 with eMMC
- Has onboard eMMC storage (8GB, 16GB, 32GB, or 64GB)
- Cannot use SD card – the eMMC takes priority
- Image must be flashed directly to eMMC
- Requires USB connection and special tools
CM5 Lite (No eMMC)
- Uses an SD card for storage
- Same process as CM4 Lite
- Note: Verify UmbrelOS supports CM5 before flashing
Flashing Methods
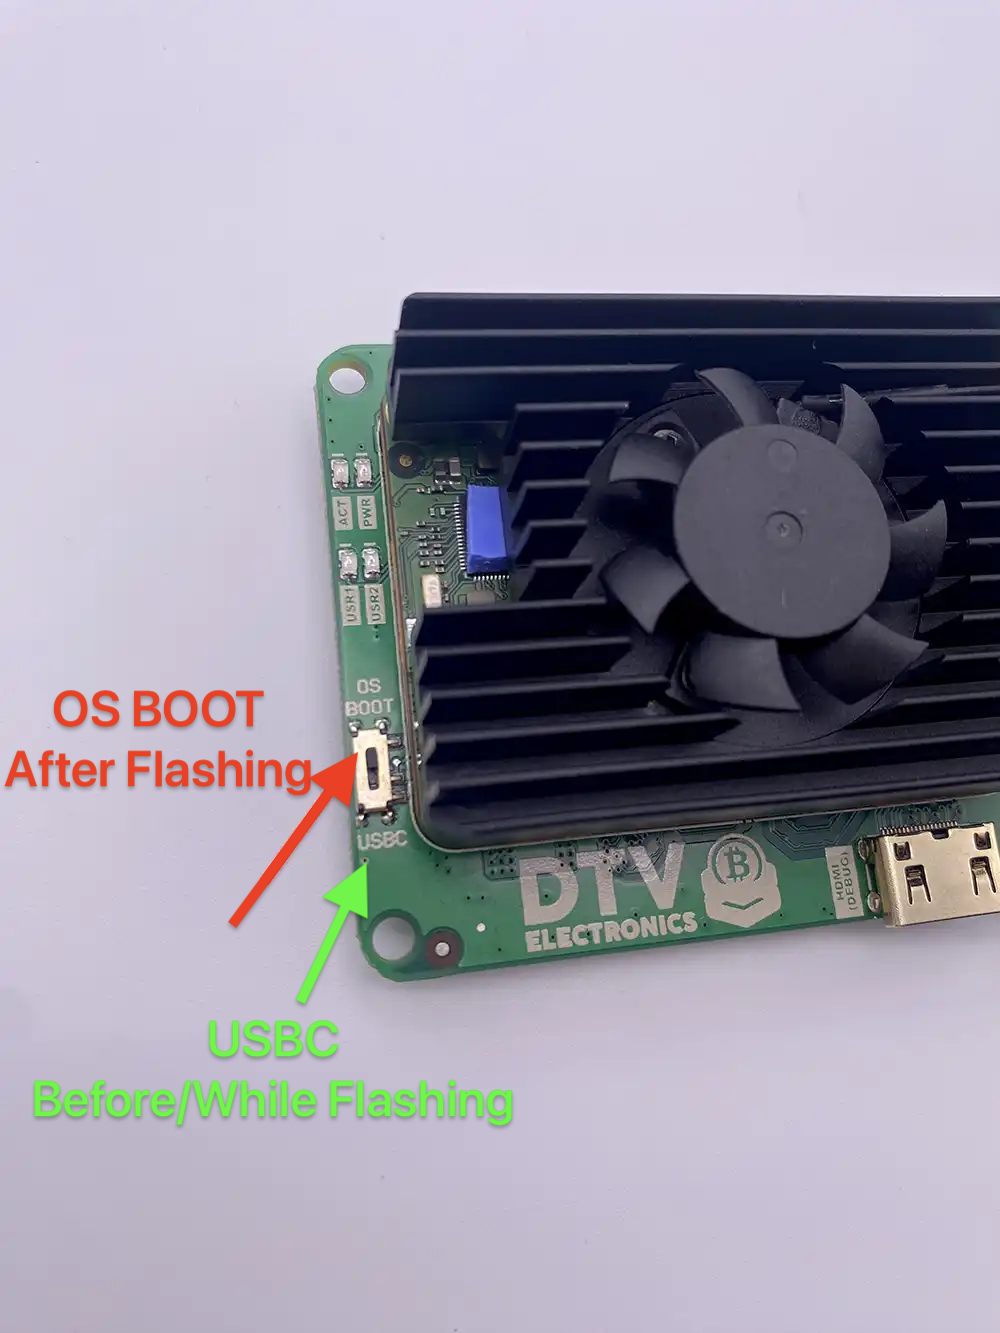
Disclaimer: You can complete this process with everything already attached to the CmRat (Compute Module, NVMe, fans, heatsink). Just remember to switch the CmRat to USBC mode before flashing, then connect it to your computer with a USB data cable and a power cable. After flashing is done, switch back to OSBOOT mode. The CmRat will automatically boot from whatever you installed.
SD Card Flashing (CM4 Lite / CM5 Lite Only)
If you have a CM4 Lite or CM5 Lite (without eMMC), follow these steps:
Requirements
- MicroSD card (16GB minimum recommended)
- SD card reader
- Computer (Windows, macOS, or Linux)
- Balena Etcher or Raspberry Pi Imager
Steps
- Download UmbrelOS Image
- Visit the official UmbrelOS website
- Download the appropriate image file (.img or .img.xz)
- Flash the SD Card
- Insert the microSD card into your computer
- Open Balena Etcher or Raspberry Pi Imager
- Select the UmbrelOS image file
- Select your SD card as the target
- Click “Flash” and wait for completion
- Install in CmRat
- Insert the flashed microSD card into the CmRat’s SD card slot
- Connect power to boot the system
eMMC Flashing From Windows
Pre-Requirement: During the flashing, flip the CmRat’s boot switch to USB Boot, then connect the CmRat via USB-C to your computer and also connect it to the power. After the flashing, flip the CmRat’s boot switch back to OS Boot, then connect the CmRat to the power & internet connection or with just one cable with the handy PoE connection for the Ethernet port.
- Download and Install RPI Boot
- Get the installer from the official Raspberry Pi website.
- Run setup and wait for driver installation to complete.
- Start Mass Storage Gadget
- Search and open “CM4/CM5 Mass Storage Gadget” from Start Menu.
- When “Waiting for BCM2835/6/7/2711/2712…” appears, connect the IO board (and remember to switch the CmRat in USBC mode).
- Red light turns green when ready—eMMC storage is now accessible.
- Flash OS
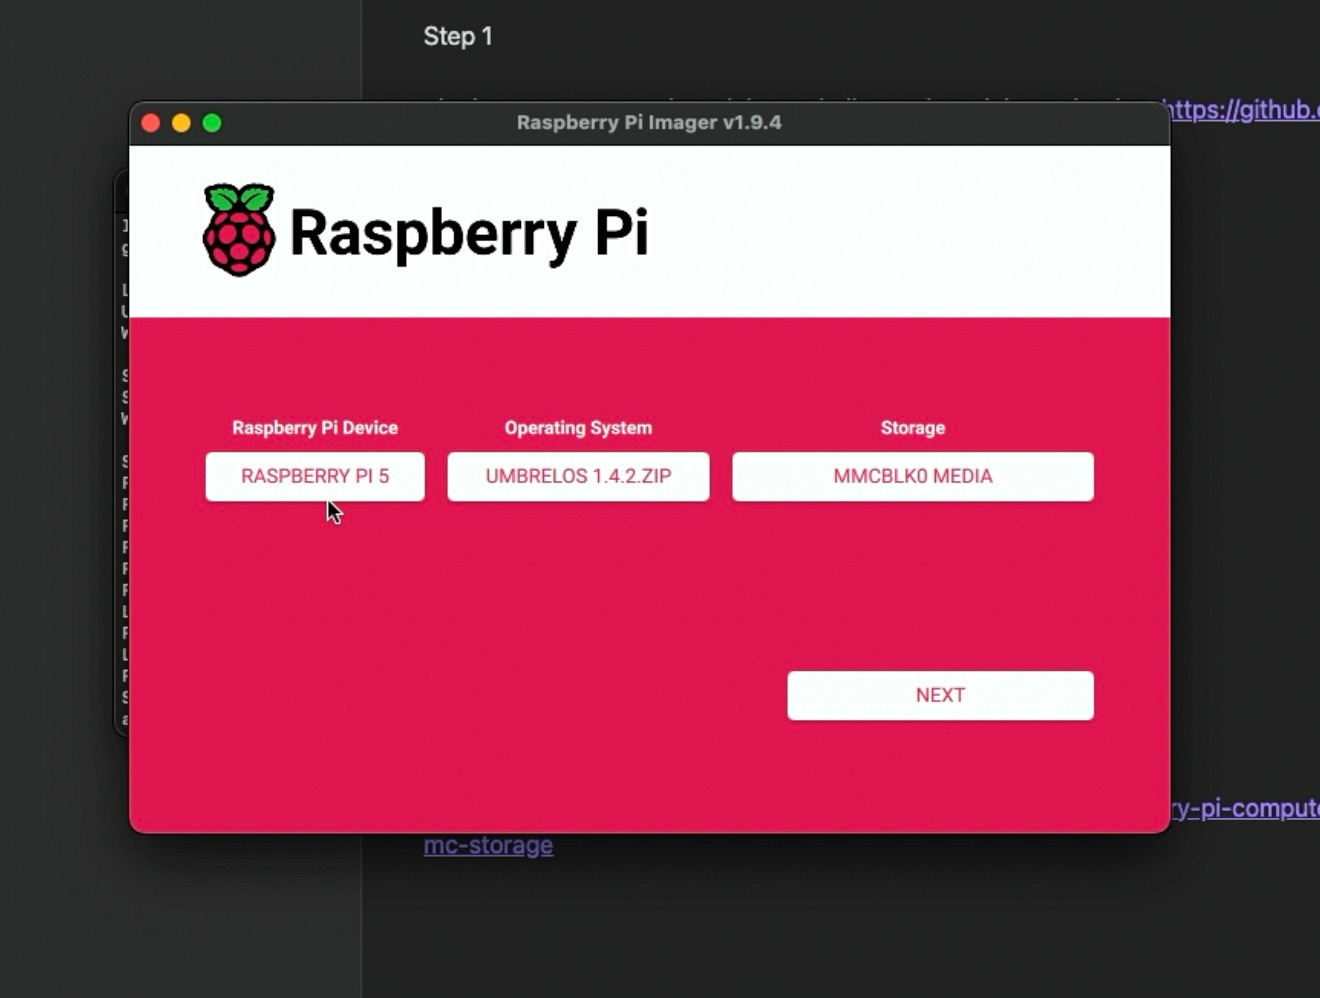
- Open Raspberry Pi Imager, select OS and eMMC storage, click “Next.”
PS: You can use this same process for flashing to NVMe. Just select the NVMe volume in Raspberry Pi Imager before you start.
eMMC Flashing From Linux
- Build RPI Boot
sudo apt install git libusb-1.0-0-dev pkg-config build-essential
git clone --recurse-submodules --shallow-submodules --depth=1 https://github.com/raspberrypi/usbboot
cd usbboot
make- Run RPI Boot
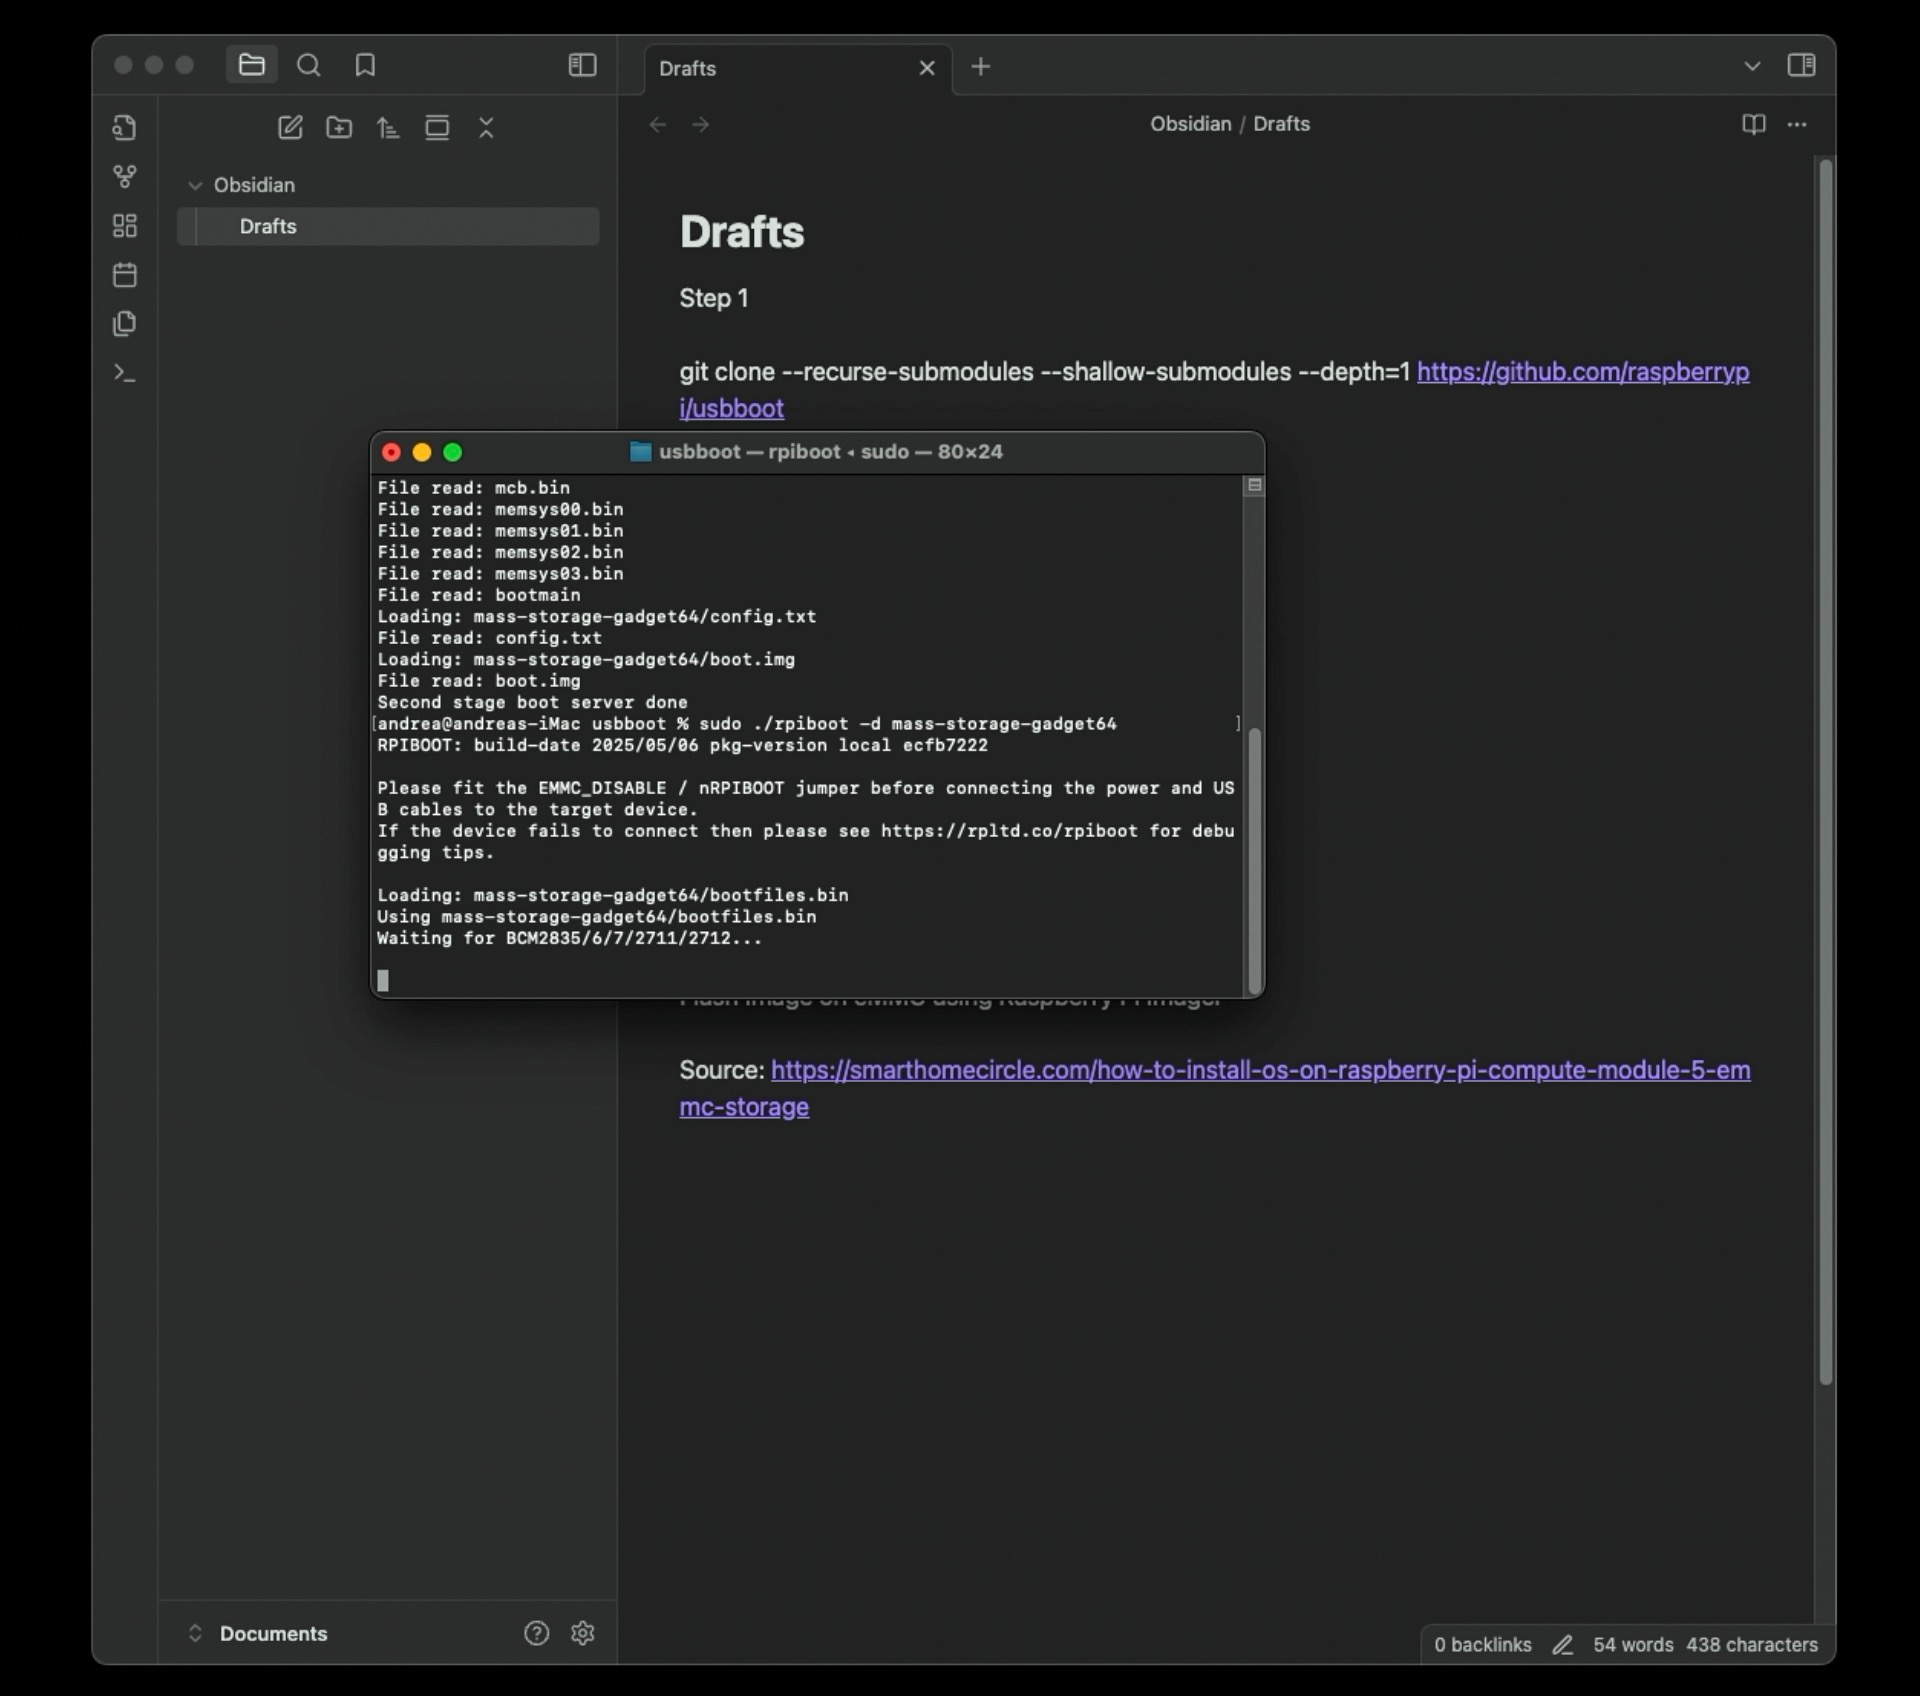
sudo ./rpiboot -d mass-storage-gadget64
- Connect IO board when prompted (and remember to switch the CmRat in USBC mode). Red light turns green when ready.
- Flash OS
- Open Raspberry Pi Imager, select OS and eMMC storage, click “Next.”
PS: You can use this same process for flashing to NVMe. Just select the NVMe volume in Raspberry Pi Imager before you start.
eMMC Flashing From macOS
- Build and Run RPI Boot
git clone --recurse-submodules --shallow-submodules --depth=1 https://github.com/raspberrypi/usbboot
cd usbboot
brew install libusb pkg-config
make
sudo ./rpiboot -d mass-storage-gadget64
- Connect IO board when prompted (and remember to switch the CmRat in USBC mode). Red light turns green when ready.
- Flash OS
- Open Raspberry Pi Imager, select OS and eMMC storage, click “Next.”
PS: You can use this same process for flashing to NVMe. Just select the NVMe volume in Raspberry Pi Imager before you start.
Troubleshooting
eMMC Not Detected
- Ensure the boot jumper is correctly placed. Remember to switch the CmRat in USBC mode.
- Try a different USB port or cable
- On Windows, install the Raspberry Pi USB boot drivers
- Verify the CM5/4 is properly seated on the CmRat
Boot Jumper Location Unclear
- Consult your CmRat documentation or schematic
- Look for labels like “OSBOOT”, “USBC” on the CmRat board
System Won’t Boot After Flashing
- Verify the image flashed completely without errors
- Make sure you switched the CmRat in OSBOOT mode.
- Check power supply (CM4 requires 5V/3A minimum)
- Try reflashing the image
SD Card Not Working with eMMC CM4
- This is expected behavior – CM4 with eMMC cannot boot from SD card
- You must use Method 2 (eMMC or NVMe flashing) instead
Additional Notes
- First Boot: The first boot may take several minutes as UmbrelOS (and other OS) initializes
- Networking: Connect ethernet cable for initial setup
- Access: After boot, access UmbrelOS via web browser at
http://umbrel.localor the device’s IP address - Backup: Always backup important data before flashing